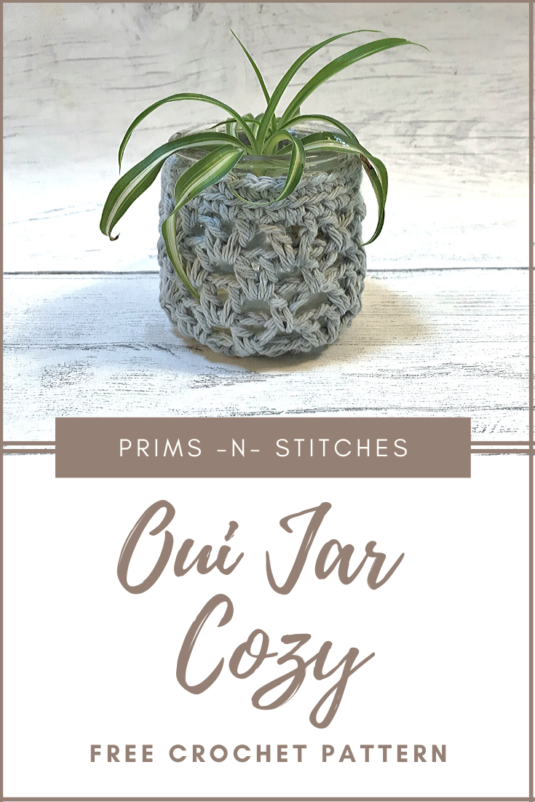
I am so excited to finally share this cozy! This a great way to reuse those adorable Oui yogurt jars.

There are many ways to use these, I have done a set of 3 in red, green, and white with tealight candles in them for a Christmas decoration. You can easily change the colors to suit every holiday!

Other things you can use these for are in bathrooms to hold toothbrushes, makeup brushes, or cotton swabs. They can be used in the kitchen to hold small utensils, coffee stirrers, or toothpicks. You can also fill them with small candies or treats and wrap with cellophane to make an adorable small gift. I made a bunch for a craft show and they were a huge hit!

Out of all of the things I have used them for, my absolute favorite is plant propagation! They are the perfect size to get my curly spider plant babies ready for planting. I used these with spider plant babies for my child’s teacher and bus driver gifts this year. You can make these into hanging mini planters! I am currently working up a tutorial on how I convert these into hanging holders.

Below you will find the free crochet pattern.
If you would like an ad-free printable PDF with a photo tutorial you can find it in my RAVELRY or ETSY shops.
Prims -N- Stitches
Oui Jar Cozy
Materials:
100% cotton yarn- Sugar and Cream
G Crochet hook
Needle for weaving in ends
Stitch Abbreviations:
MC- magic circle
blo- back loop only
sts- stitches
SLST- slip stitch
Ch- chain
SC- single crochet
DC- double crochet
TC- triple crochet
V-ST- V stitch- (double crochet, chain 1, double crochet) in same space
Special Instructions: Beginning chains count as 1st stitch in each round until you reach the last two rows. You will be working into the spaces between stitches from previous rows, not the actual stitch itself for most of the cozy, please see pattern for details.
Instructions:
Round 1: Make MC; Ch 3, 9 DC in magic circle. Join around beginning chain. – 10 sts
Round 2: Ch 4, 1 TC in same space as join, 2 TC in each space around. Join around beginning chain. (You will be working in the spaces between stitches, not into the stitch itself.) – 20 sts
Round 3: Ch 4, DC into space between last TC and beginning chain from previous round. [skip 1 space; (dc, ch1, dc) in next space.] Repeat from [ – ] around, join around beginning chain. – 10 V stitches made.
Round 4: Ch 4, DC into space between last DC and Ch from previous round. [ (dc, ch1, dc) in between each V from previous round.] Repeat from [ – ] around, join around beginning chain. – 10 V sts
Rounds 5-7: repeat round 4.
Round 8: *you will work in spaces and stitches in this round* Ch 1; [sc in ch1 space, sc in each of next 2 stitches] (tops of Double crochet stitches from previous round). Repeat [ – ] around until you’ve made 27 stitches. SC in next chain space, SC in next stitch. Join to 1st SC in round. – 29 sts
Round 9: Ch 1, SC in blo of same stitch. SC in blo around – 29 sts
*Finish off and weave in ends*
© 2020 Prims -N- Stitches All Rights Reserved. Please do not copy, resell or distribute my patterns or the pictures within, on or offline. Share the link instead of the pattern. Feel free to sell finished items made by using this pattern, and please give credit to me as the pattern designer.
I love it and I love how quickly it works up. I’d love to see your tutorial on converting it to a hanging plant holder!
Hi. I recently purchased this pattern from your Etsy store. I am relatively new to crochet however, I am able to crochet the magic circle, TC, etc., I am having a bit of trouble with the instructions. I am on Round 2 and wish there were a few more photos, as it’s not clear where on the MC you insert the hook to crochet the TC. How many TCs in total? Not clear on what is meant by “in each space around” A photo would really help to clarify what is meant by: “You will be working in the spaces between stitches, not into the stitch itself.”
Hoping for just a little more information. Thank-you.
When you’re looking at the MC, you will see the posts of the stitches, and the part that you normally crochet into on top. You will be inserting your hook in between the posts (space between stitches) instead of the top part that your normally insert your hook into (the stitch itself) There is a picture of round 2 on the paid pattern, right next to the instructions for round 2. And, as stated in the pattern there will be 20 TC total.
Thank you,
Erin